This article was published in PCA Potomac's Der Vorganger
Nifty Tools: Inductive Ammeter
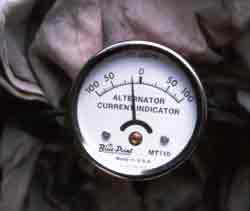
A small and inexpensive tool that will fit in your track tool box is an Inductive Ammeter Tool Set (SNAP-ON P/N MT1009, price about $40.00). This is a very useful tool for diagnosing problems in the electrical system that cannot be found easily by any other method. For instance, it will answer the question " Is there enough current from the alternator (generator) to supply the current consumers (headlights, heater fan, AC etc.) on the car?" It will also answer the question "Is there is enough additional current to charge the
battery?" It can determine if the charging system is overcharging the battery, and also can check the starter draw to see if the starter is dragging and depleting the battery excessively. See Picture #1

Picture #1
As shown the set consists of two 2-inch gauges. One gauge is for charging currents and has a range of 100 amps; the other gauge is used for measuring larger starter current loads and has a larger range of 600 amps. The backside of the gauge has an aluminum trough into which the wire to be measured is placed. See Picture #2.
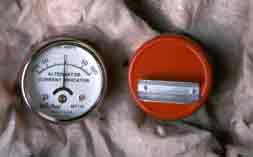
Picture #2

picture #3
Picture #3 shows back of gauge with wire in trough.
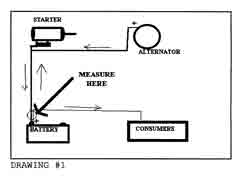
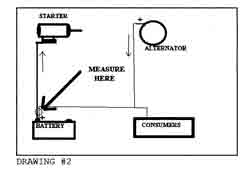
To find the net charging current to the battery, first locate the wires off of the positive battery post. Usually there will be one big black wire from the starter and at least one red wire supplying the current to the car's consumers. (Some cars connect the output of the charging system to the starter terminal and use this heavy black cable to carry the charging current from the starter terminal to the battery.) See drawing #1 and #2
With the engine not running, first turn on the headlights, and place the charging gauge onto the smaller red wire (s). Note the direction of the needle and the value displayed on the gauge. This is to determine a reference direction for the discharge value since the gauge is bi-directional.
Now with the headlights turned off, start the car and let the car idle. (Make sure that the throttle has been blipped over 1000 rpm to ensure that the voltage regulator has been turned on.)
Note the value on the gauge which should be between 10 and 20 amps initially. See Picture #4
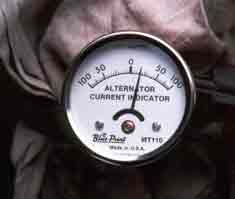
Picture #4
Move the gauge onto the black wire from the starter keeping the same orientation of the gauge, see Picture #5.
Picture #5
Note the value, if any and direction of the needle. (This will depend on how the charging circuit is wired into the car )
The algebraic sum of these two values will determine the charging rate at idle. Knowing the direction of the needle in the first test (engine off-headlights on) will determine the direction of current coming from the battery. This is defined as a discharging direction. If the sum of these currents is in this direction, the battery is being drained at idle. Usually the rate of loss of about 5 amps is tolerable for short periods for cars with a generator. If the sum of these currents is in the other direction, the battery is being charged. The alternator equipped car will be charging 5 to 10 amps with the battery fully charged at idle.
Now raise the RPM to about 2500. This will be about the minimum point where the alternator will reach its maximum charging rate. At this RPM the algebraic sum should still be about 5 to 10 amps in the charging direction with a fully charged battery. Refer back to Pictures #4 and #5.
Note: A fully charged battery is defined as having a voltage value of 12.60 volts measured with a digital voltmeter (which is more precise and accurate than an analog voltmeter). The specific gravity should be 1.260 but with some sealed batteries it is not possible to obtain this measurement. Sometimes a sulphated battery will exhibit this voltage value but have no reserve energy to turn over the starter. (When starting the engine, the battery voltage will drop due to the large current draw and the internal resistance of the sulphation. If the voltage drops below 9-11 volts (dependent on model year) the computers and the CD boxes usually won't operate properly.
If there is any doubt about its condition the bottom line method to determine the viability of the battery is to load test it with a carbon pile
If the battery is very dead and all the current consumers are on, the alternator will charge near the maximum rating of the alternator, at least for a short time. In the late model cars the alternators can put out about 100 amps; the early 911's would be capable of about 55 amps. The 6
volt cars have a capability of about 30 amps.
The inductive ammeter starter gauge is very useful for measuring starter current draw.
Usually for a four cylinder starter the current draw will be about 120 amps. A six or eight cylinder will draw up to about 250 amps. Higher compression engines will draw more current. Gear reduction starters will draw about 20% more current.
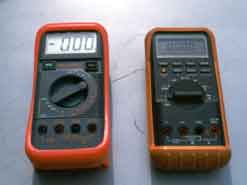
Also bear in mind that this particular type of gauge, the external inductive ammeter, although cheap and rugged, is not as accurate as the later design digital ammeters that completely surround the wire to be measured. Picture #5a shows a comparison between the two gauges. The round gauge overreads about 20%.
Picture #5A
EXAMPLES OF PROBLEMS
The advantage of the inductive ammeters is that they can give a quick diagnosis of the charging and starting systems.
For instance if the gauges determine that the system charges well with the consumers off, and won't deliver enough current to supply the headlights or heater fan, the regulator and/or alternator is at fault. The symptoms would be yellowed headlights at night and difficult starting in the morning only.
If the gauges determine that the battery is not being charged at all, then the problem would be the regulator and/or alternator. The symptoms would obviously be the battery continuously needing recharging.
If the charging rate to the battery never dips below 20 amps on a fully charged battery and the battery gets hot, the alternator system is overcharging. (The running battery voltage will be about 15.5 volts or higher in this case.) This is not uncommon in the late 911's where there is a lot of wear on the brass commutator rings in the alternator. Usually the normal protocol is to replace the alternator.
If the starter draw is above specifications, the symptoms will be battery depletion especially if the car is used on short trips. Sometimes a bad starter bushing (the end bearing ovalled out) will cause excessive draw because this is the outboard bearing for the starter and the armature is not held in true alignment in the center of the magnetic field produced by the field coils. Gear reduction starters are known for wearing out their internal bushings. The starter draw should always be checked when there are battery depletion problems.
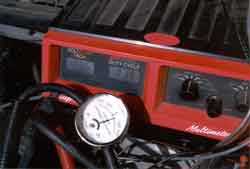
A second valuable diagnostic tool, more expensive and more delicate than the previous tool set, is a DMM (Digital Multimeter). This is Snap-on P/N EEDM5O3A (priced about $100.00) Although this meter is not as nice nor as accurate as a FLUKE meter, it is a relatively inexpensive digital multimeter with the largest LCD display in the industry. (The FLUKES cost about $300.00 to $400.00) See Picture #6 (Snap-on on left, Fluke on right)
Picture #6
This is very useful as a home and/or home garage tool; it will allow a very quick determination of the state of charge of the battery:
VOLTAGE SPECIFIC GRAVITY
12.60-12.72 volts 100% charged 1.280-1.260
12.45 75% charged 1.250-1.230
12.30 50% 1.220-1.200
12.15 25% 1.190-1.170
NOTE: These measurements are obtained after the surface charge of the battery is burned off. This is done by turning on the headlights for 15 seconds. 6 volt values are obtained by halving these 12 volt values.
The second advantage of the DMM is that when measuring voltages, the DMM presents a very high impedance to the circuit being measured. This is especially important when it comes to measuring circuits from the ECU (Electronic Control Unit). The ECU is very sensitive because most of the time 5 volts is used as a reference voltage going to most of the sensors and as a result it is very sensitive to any small changes in resistance. Analog voltmeters usually present 20,000 ohms per volt loading of the circuit; DVM's are usually rated in the megohms per volt.
Additionally the DVM allows small measurement capability with precision. For example voltage drops of ground points can be measured. Small current blockages due to slightly increased internal resistances can now be located. These points have the potential of causing marginal or
intermittent problems to either electrical circuits or to the computer's functioning. Some examples of voltage drop criterion are:
Small wires (for low current capability) 200mv
Ground connections l00mv
Low current switches 300mv
In order to diagnose difficult electrical problems at home, the Inductive Ammeters and the Digital Multimeters would be an absolute necessity to own.